Salesforce

Task Scheduler - Setup, Apply And Delete Finance Charges

« Go Back
Article Info
000004569

In Dentrix, you can apply finance charges in the new Reports and Task Scheduler.   It is no longer required for Dentrix to be closed on all computers to perform these tasks.  


Solution

Jump to a topic:


 Apply finance charges to multiple accounts

You can apply finance charges to accounts with or without payment agreements.  You can apply finance charges to all or part of your patients automatically, allowing Dentrix to calculate the charges, or you can enter the finance charges manually for individual patients at any time. The finance charge option is used to calculate and create finance charge entries for accounts automatically.

You can apply finance charges on a monthly basis.  Although you have the ability to apply the finance charges at any time during the month, we recommend it is done at the end of the month.  If you choose to apply finance charges at a different time, apply them consistently and at about the same time each month. 

1. Back up your Dentrix database. 

2. Launch the Reports and Tasks Scheduler.
*For a detailed explanation of the Scheduler, as well as a list of available reports and tasks, please see article 86271. 

  • In the Ledger menu, click Task Scheduler (Month End).
  • Or in the Office Manager menu, click Maintenance, and then click Task Scheduler (Month End).

The Reports and Tasks Scheduler dialog box appears.
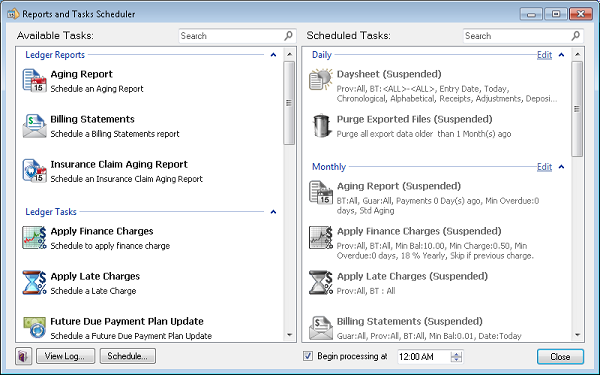
  

3. In the Available Tasks list, double-click Apply Finance Charges.

The Task dialog box appears.
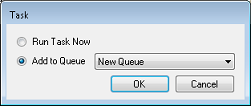
  

4. Select the appropriate option:

  • Run Task Now (default).
  • Add to Queue and select a queue from the list.

The Apply Finance Charges dialog box appears. 
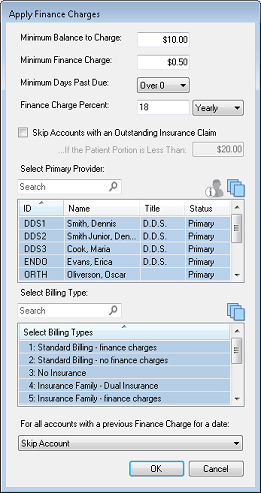
 

5. Adjust one or more of the following options:

  • Minimum Balance to Charge – When assessing finance charges, the minimum balance to each aged account balance is compared and a finance charge is only applied to accounts with an aged balance greater than the minimum. The minimum balance defaults is $10.00, but you can change this amount.
  • Minimum Finance Charge – Accounts are charged the amount entered in this field when the calculated finance charge is less than the amount. The default is $.50, but you can change this amount.
  • Minimum Days Past Due – Finance charges are calculated on the portion of each account balance that is past due, according to the option you select and the aging of the account as of the Finance Charge Date. The default is Over 0 assuming that charges are due when they are incurred.IMPORTANT: If you do not want to apply finance charges to current accounts, you must change this option. Additionally, when finance charges are applied using the minimum days past due (Over 0, Over 30, Over 60, Over 90), charges are applied according to real time, and is not dependent on the month being closed. For example, when running finance charges for all accounts over 90 days it will still includes accounts that have balances where the actual date of the transaction is over 90 but the aging on the family balance has not yet been moved into the over 90 days category.
  • Finance Charge Percent – The finance charge is calculated as a percentage of the amount owed. Type the percent that you want to charge and then select Monthly or Yearly. By default, finance charges are calculated on a monthly basis, so if you select Yearly, the percentage is divided by 12 to derive a monthly charge. For example, if you want to apply an 18% yearly finance charge to outstanding balances, that 18% is divided by 12 months to arrive at a monthly finance charge of 1.5%.
  • Skip Accounts with an Outstanding Insurance Claim – Select to skip accounts with outstanding insurance claims, and then type an amount in the If the Patient Portion is Less Than text box (default is $20.00). 
  • Select Primary Providers – From the list, select the providers whose patients you want to apply finance charges to. By default, all providers are selected
  • Select Billing Types – From the list, select the billing types that you want to apply finance charges to.  By default, all billing types are selected.
  • For all accounts with a previous Finance Charge for a date
    • Skip Account (default) - This is will skip any account that has already had a finance charge assessed to it in the same calendar month
      • Example: March 2nd you applied a finance charge and today is March 30th.  That account will be skipped since it is applied in the same calendar month.  
    • Replace previous Finance Charge with the new Charge - This will replace finance charges assessed in the same calendar month
      • Example: On March 1st you applied finance charge to all accounts and on March 30th you ran it again.  It would take out the entry on the Ledger from March 1st and replace it with a finance charge dated March 30th. 
    • Add Additional Finance Charge - If a finance was charged on March 1st and you ran it again on March 30th you would have 2 finance charge entries on the Ledger.
      • Example: Today's date is March 1st and you previously ran finance charges on February 28th.  It will not replace the charge; it will add a new finance charge entry because we are in a new calendar month.  

    NOTE: The date of the finance charge is the date it is ran, not the Close Transactions date.  

6. Click OK.

If you selected Run Task Now, finance charges are calculated immediately.  If you selected Add to Queue, the report or task is added to the Scheduled Tasks list.
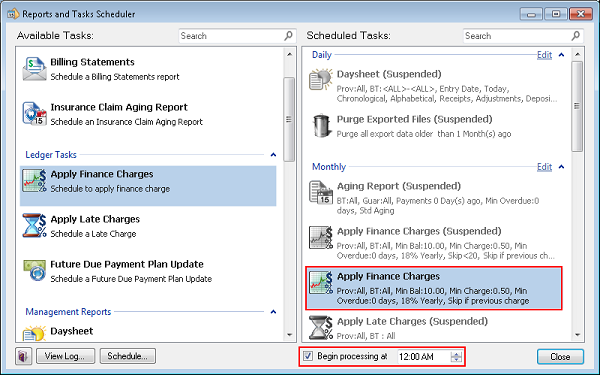
 

7. In Begin processing at, set the time you want the report or task to process (default is midnight).  The report or task processes automatically at the time you set and according to the queue you placed it in.

8. In the Scheduled Tasks list, click Edit to the right of the queue name.  

The Edit Queue dialog box appears. 
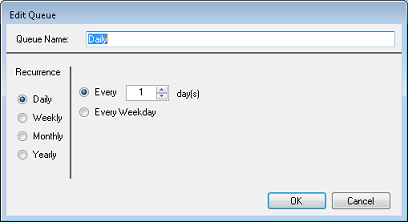
 

9. Complete one or more of the following tasks, and then click OK:

  • Queue Name - If you are creating a new queue, type a unique in the text box.
  • Recurrence - Select one of the following options:
    • Daily - Sets the queue as a daily task. Select Every and then set the number of days you want the task to recur, or select Every Weekday (recurs every business day).
    • Weekly - Sets the queue as a weekly task. Set the number of weeks (1 for every week, 2 for every two weeks, and so on, and then select the day of the week you want the task to run.
    • Monthly - Sets the queue as a monthly task. Select Day, and then set the day of the month and how often the task recurs. For example, Day 1 of every 1 month(s) means the task recurs on the first day of every month. Or, select the second option to set the task to recur on the first, second, third, or fourth selected day of the week every month. For example, to run a task on the second Tuesday of every month, you would select: Second, Tuesday, and the number 1 (every two months 2, every three months 3, and so on).
    • Yearly - Sets the queue as a yearly task. You can set to a date of a selected month or as the second Tuesday of March.

Back to top


Apply finance changes to individual accounts 

In addition to applying finance charges at month end, you can also apply finance charges for individual accounts manually.

1.   In the Ledger's Transaction menu, click Enter Finance Charge or Late Charge.

The Enter Finance Charge or Late Charge dialog box appears. 
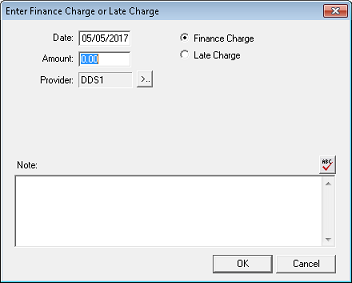
 

2.   Do the following:

  • Amount - Type the amount of the finance charge.
  • Type - Select Finance Charge.
  • Provider - Click the search button and then select the patient’s provider. (By default, Dentrix selects the patient's primary provider.)

3.   Type a note.

4.   Click OK to save any changes and apply the finance charge.

Back to top


Delete finance charges from a specific account

1.   With a patient selected in the Ledger, double-click the finance charge.

The Change or Delete Finance/Late Charge dialog box appears. 
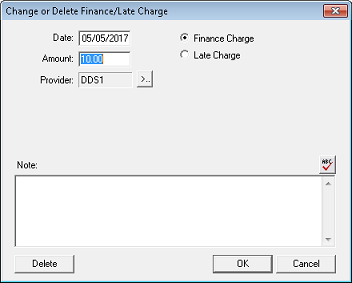
 

2.   If necessary, type a brief note on the Note text box.

3.   Click Delete

Back to top


Delete finance charges from all accounts for a specific date (undo)

1. Open Office Manager, click on Maintenance and choose Delete Finance Charges.

     The Delete Finance Charges dialog box appears.


3. Choose the Finance Charge Date to remove charges from.

4. Click OK 

Back to top


Article Properties
Task Scheduler - Setup, Apply And Delete Finance Charges
86049

Powered by